Upholstery Tips & Tricks

I have been doing upholstery work for a few years now. I started with a $5 chair for myself and have built it into a business. People ask me all the time how I learned how to so this. I always say I learned by doing it. Tearing things apart will tell you how to put them back together. Take pictures. Make notes. I have learned so many techniques by looking at how the person before me did it. I have also learned by reading everything I could find on the subject and watching tons of You Tube Videos. They have been a huge help. (Well not all of them some are better than others.) Now that I've been doing this awhile I watch videos not to see the technique they are demonstrating but to hear the little tricks they throw out that they don't even think are important. I love it when people start rambling. That's when the little nuggets of gold come out that you learn from doing. Tricks of the trade. People sharing information. It's a beautiful thing. Oh and last but not least I learned from the employees at the places I get my supplies. I used to just ask for what I thought I needed but once I decided to use them as a resource I got some great info.
I decided to write this post for those people out there like me that haven't had the luxury of formal classes but are learning as they go. All the tips I am sharing here are small things but so helpful. Little Nuggets.
Upholstery Sewing on a "regular" Machine
If you don't have an industrial sewing machine and are using a regular home sewing machine use the longest stitch possible. For some reason I thought when I first started upholstering that a smaller stitch would be better. After talking with an expert she recommended a longer stitch to avoid bunching and pulling of the fabric. It makes a difference. I have since upgraded to an industrial machine to read my post about my machine go here.Removing Hot Glue from Fabric
Sometimes it happens. You're attaching gimp or welting to finish off your masterpiece and a little spec of the dang hot glue drips on the fabric. Or perhaps the trim slips and some hot glue gets where it has no business being. Here's a tip to remove it.
Lay a piece of clean cloth on top of your hot glue spot. Warm the glue with your iron and the hot glue will transfer to the piece of cloth. You may need to do it a few times to get it all off. Make sure you use a clean location on the cloth if you move it so you don't transfer the hot glue to another spot on your piece. Always test on a scrap piece of fabric before using an iron on your finished piece. Results will vary depending on the fabric.
Smoothing out Lumps and Voids
Once in a while, heaven forbid, there may be either lumps of batting or small voids where there should be batting in your finished piece. I find it often happens where the arm meets the back especially on wing back chairs. When this happens use an upholstery pin or large needle to gently move the batting to where you need it to be.
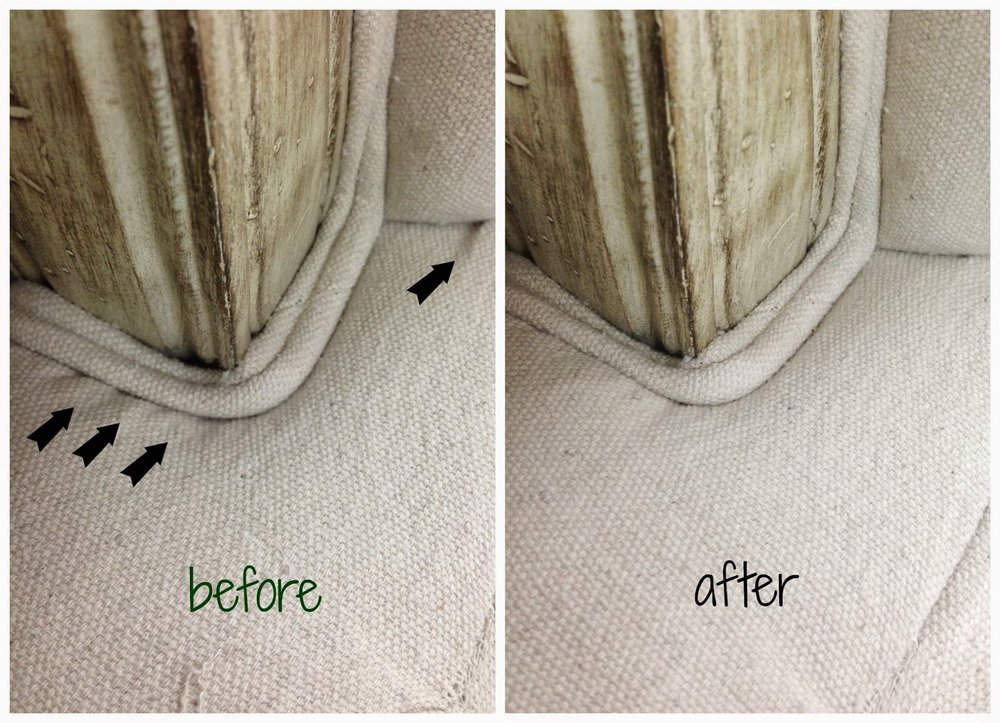
Different fabrics may show the hole from the needle so test in a hidden area before trying on your finished piece.
Steaming out the Wrinkles
I swear some fabrics are like a white pair of jeans, they show everything. Some fabrics just lay better than others. To help smooth out wrinkles or areas where the fabric may look a little stretched out use steam. Your iron may have a steam option but if you do a lot of upholstery work you may want to invest in a portable steamer. I purchased a Shark Steamer and I have been very happy with it. Always test on a scrap piece of fabric before using steam on your finished piece. Some fabrics could melt.Freshening up old Foam
Another great use for a steamer is to freshen up old foam. I give my clients the option of reusing their old foam or replacing with new. Most people choose to reuse what they have if it's in decent shape because foam is pricey. A steamer can freshen up old foam and also sanitize it.Staples instead of Pins
I have shared this tip before but it is a good one and bears repeating. When sewing cushion covers use staples instead of straight pins to hold your pieces together. The best part is not getting poked with pins. Just be careful not to staple on the line where you will be sewing. When you are finished sewing simply remove the staples with a staple puller. For more details check out my post about sewing better cushion covers.
Keep your Spray Adhesive from clogging
Spray adhesive nozzles get hopelessly clogged rather quickly. Nothing is more annoying than spray adhesive shooting out the side and landing where you don't want it to be. To help avoid this after you done using the spray adhesive simply swipe the nozzle across the foam. This will clean the nozzle off.

Cutting Foam with a Bread Knife and Silicone Spray

I used to use an electric bread knife to cut my foam but when I recently purchased a professional foam saw the salesperson recommended I use silicone spray to lubricate the blades and help it cut through the foam better. It made me think, maybe I should just buy a can of silicone instead of the spendy new tool and stick with my bread knife. I decided I cut foam enough to justify the expense. For those who rarely cut foam an electric bread knife does work. What makes it work better is lots of silicone spray. I have heard about using an electric bread knife to cut foam many times but it never occurred to me to use silicone spray
I hope you found something helpful to make your upholstery life just a little easier.
