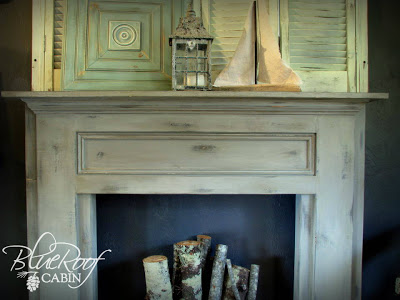
Mantel Made From Pine Boards
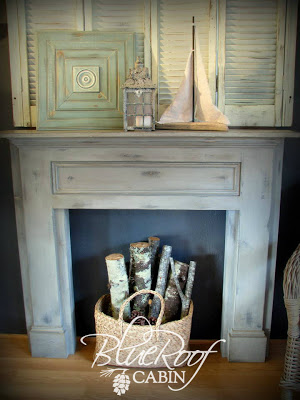
I love mantels. They are so much fun to build. I've got another one I built to share with you. The design was based on some inspirations that I've pinned (to see my board go here) and the mantel I refurbished a while back. It sold pretty quickly so I thought I'd try another.
If you've been reading for awhile you no I like furniture with clean lines. Not quite primitive but almost. My favorite part about this design is I used 1 x pine boards in their stock sizes so no need to rip anything down. The only tools you need to build it are a chop saw and a nail gun. No nail gun? then you can use a good old fashion hammer and finish nails or a drill and screws.

Here's how I built it.
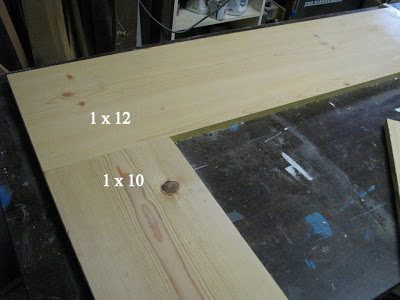
To start lay out a 1 x 12 board and butt a 1 x 10 against it.
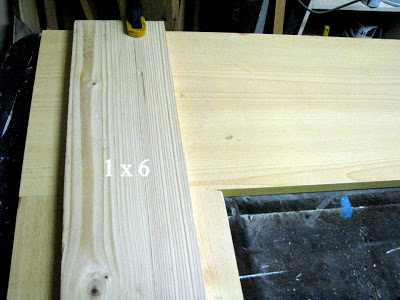
Lay a 1 x 6 on top centering it on the 1 x 10. I attached with glue and nails using my nail gun.
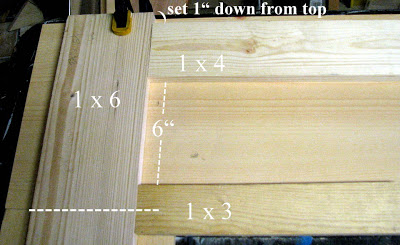
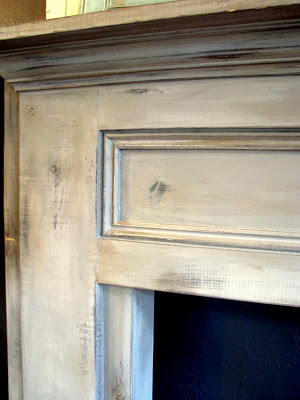
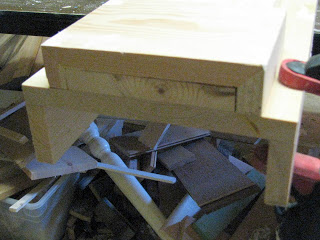
To create the panel place a 1 x 4 at the top attaching it 1" down from the top of the 1 x 12. This is so when the crown is attached there will be the same amount showing as the bottom 1 x 3. Also some will be under the crown for it to rest on and attach to. As you can see in the above photo the bottom 1 x 3 extends below the 1 x 12. I did this because I wanted at least 6 inches for the inside of the panel.
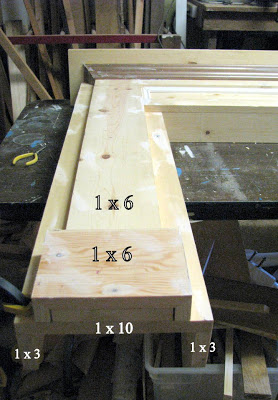
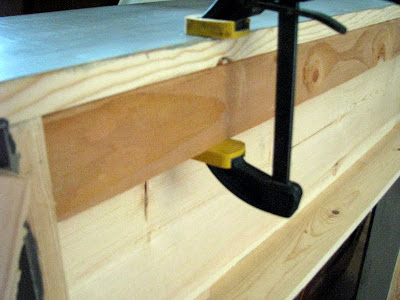
To give the mantel some depth and allow for the 1 x 8 top I added 1 x 3's to the back attaching with glue and nails. The middle one however needed to be 3 1/4" because I had moved the bottom 1 x 3 for the panel down.
Then I added a trim to finish off the base. For a more primitive look just don't add the crown or trim.
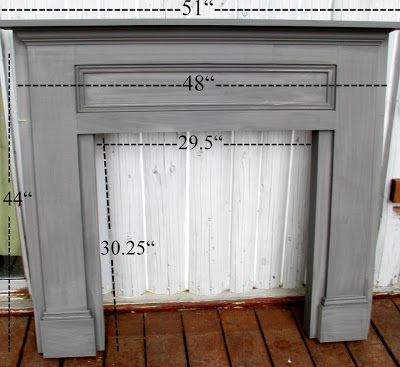
Here's the final measurements:
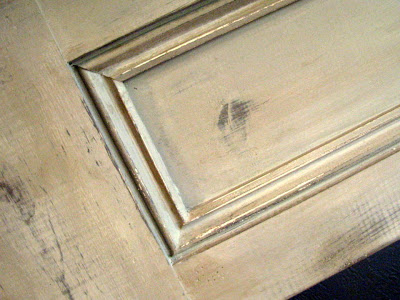
Now for the paint finish. The base coat is a charcoal colored latex shown above. The top coat is Annie Sloan Chalk Paint in French Linen. Sealed with Annie Sloan Clear and Dark Wax. I really need to learn how to use my camera I have a hard time capturing the true color and depth of the finish.
I wish I could put a mantel in every room.
I appreciate you stopping by!

****Want more info? Detailed Plans for how to make this mantel now on Ana-white.com.
Playing at the following parties:
If you've been reading for awhile you no I like furniture with clean lines. Not quite primitive but almost. My favorite part about this design is I used 1 x pine boards in their stock sizes so no need to rip anything down. The only tools you need to build it are a chop saw and a nail gun. No nail gun? then you can use a good old fashion hammer and finish nails or a drill and screws.
Here's how I built it.
To start lay out a 1 x 12 board and butt a 1 x 10 against it.
Lay a 1 x 6 on top centering it on the 1 x 10. I attached with glue and nails using my nail gun.
To create the panel place a 1 x 4 at the top attaching it 1" down from the top of the 1 x 12. This is so when the crown is attached there will be the same amount showing as the bottom 1 x 3. Also some will be under the crown for it to rest on and attach to. As you can see in the above photo the bottom 1 x 3 extends below the 1 x 12. I did this because I wanted at least 6 inches for the inside of the panel.
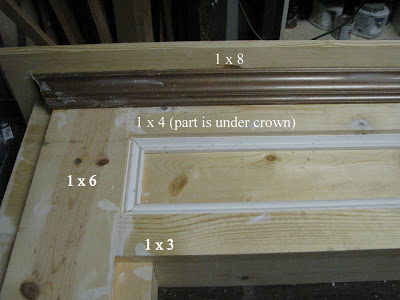
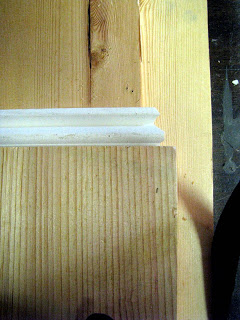
I then added trim mitered at the corners.
To give the mantel some depth and allow for the 1 x 8 top I added 1 x 3's to the back attaching with glue and nails. The middle one however needed to be 3 1/4" because I had moved the bottom 1 x 3 for the panel down.
I ended up ripping a 1 x 4 on my table saw. If you don't have a table saw you could use a 1 x 2 below the 1 x 12 then add your 1 x 3 to that. Make sense?
(I throw all my wood scraps under the table eek)
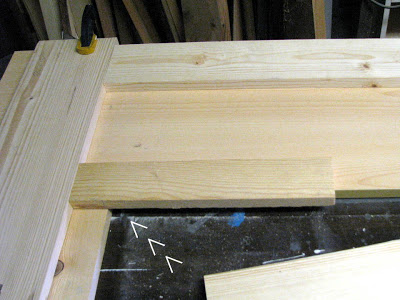
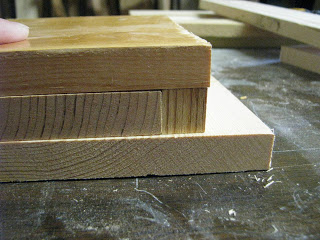
For the base trim I used the remainder of the 1 x 6. I mitered the corners because I just got a new chop saw (it's dreamy). If you have a smaller chop saw like my old one that won't handle that big of a board you could just do what is pictured below. That's why wood putty is a builders best friend right?
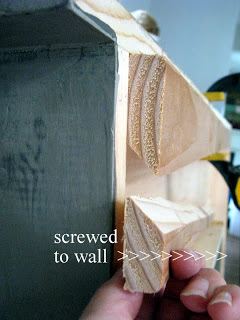
To attach it to the wall I made a cleat by ripping a 1 x 4 at a 45 degree angle down the middle. One half attaches to the mantel.
The other half is attached to the wall with at least two screws preferably into studs. Then slide the mantel onto it. Works great and no visible screws!
If you don't have a way to rip a board you can attach a 2 x 2 to your wall, set the mantle on top of it and screw through the top shelf into the 2 x 2.
Here's the final measurements:
Now for the paint finish. The base coat is a charcoal colored latex shown above. The top coat is Annie Sloan Chalk Paint in French Linen. Sealed with Annie Sloan Clear and Dark Wax. I really need to learn how to use my camera I have a hard time capturing the true color and depth of the finish.
I wish I could put a mantel in every room.
I appreciate you stopping by!
****Want more info? Detailed Plans for how to make this mantel now on Ana-white.com.
Playing at the following parties:
Primp - Primp Your Stuff Wednesday
Home Stories A to Z - Tutorials & Tips
My Romantic Home - Show and Tell Friday
My Repurposed Life - Catch as Catch Can
French Country Cottage - Feathered Nest Friday
Farm House Porch - Cowgirl Up
Funky Junk Interiors - SNS
Miss Mustard Seed - Furniture Feature Friday
Home Stories A to Z - Tutorials & Tips
My Romantic Home - Show and Tell Friday
My Repurposed Life - Catch as Catch Can
French Country Cottage - Feathered Nest Friday
Farm House Porch - Cowgirl Up
Funky Junk Interiors - SNS
Miss Mustard Seed - Furniture Feature Friday