Buffet Cabinet into a Vanity
Hello there! I have a project to show you. I really should wait til I have the after beauty shots before I post about this but oh well I'll show you anyways.

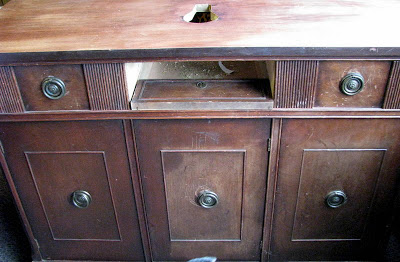
(before-ish)
This is the antique buffet she found. I forgot to take a true before picture. The finish was rough but the cabinet was solid. One thing to consider when you want to use a piece of furniture in this way is the height. This buffet is a good two inches higher than her bathroom counter was. Add to that a vessel sink and this is a lot higher than standard. For my sister's family this is fine. She doesn't have small children in the house and they are all taller than 5'7. I told her I thought it would be too tall with a vessel sink. I suggested that before she purchased a sink & while the buffet was in her living room she should place a bowl on top of the buffet and take a few days to see how it felt. She did and she felt it was fine. So I admit I was wrong. I'm 5'4 and when I use the sink I think it's fine too. I can't help but chuckle though thinking about when our little nephew comes over he is gonna look up at that faucet and be like, Um what do I do?
The next thing to consider is the depth. Her cabinet was only 19" deep so we had to consider that when buying the sink and faucet.
Each piece of furniture is different but the first thing we did was take the back off. Then we cut the holes in the top for our sink and faucet.
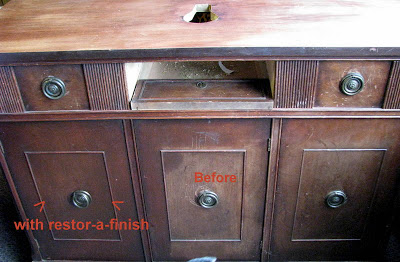
The top was in rough shape. We initially thought we would paint the whole thing but my sister really liked the wood. It's Mahogany. We decided to strip off the finish on the top only. She didn't want to strip the whole thing and I definitely didn't want to either so we decided to try a product on the rest of it called Restor-a-finish. You can get it any of the big Home Improvement stores. We figured if it didn't work we would paint it.
The next thing to consider is the depth. Her cabinet was only 19" deep so we had to consider that when buying the sink and faucet.
Each piece of furniture is different but the first thing we did was take the back off. Then we cut the holes in the top for our sink and faucet.
The top was in rough shape. We initially thought we would paint the whole thing but my sister really liked the wood. It's Mahogany. We decided to strip off the finish on the top only. She didn't want to strip the whole thing and I definitely didn't want to either so we decided to try a product on the rest of it called Restor-a-finish. You can get it any of the big Home Improvement stores. We figured if it didn't work we would paint it.
We used the dark walnut color and it worked really well. It filled in all the scratches and freshened everything up.
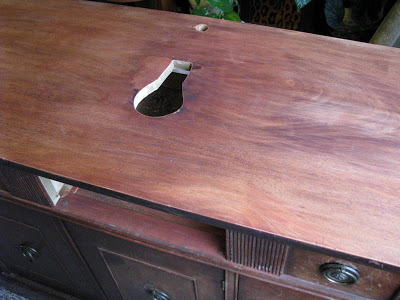
(after finish was stripped off)
For the top we used Citristrip which is less harsh then other strippers. You still need to wear chemical resistant gloves, use eye protection and have proper ventilation which we did. (Be careful with chemicals and follow all directions) We brushed it on and left it for about an hour then scraped it off with a putty knife. It worked great. We then used mineral spirits to clean off the residue and lightly sanded it.
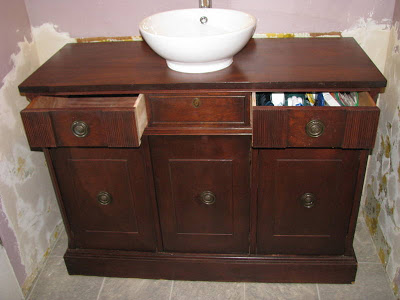
Next we applied two coats of walnut gel stain. The walnut stain cut the redness of the mahogany and matched the existing finish on the body of the cabinet beautifully. Plus the bathroom has no windows so the lighting is very forgiving. At this point I had to go home and I left it to my sister to apply the three coats of oil based poly to seal it.

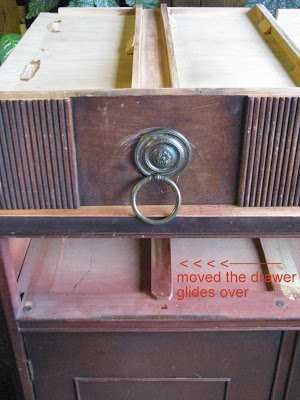
(reenactment to show it was one drawer)
I took the drawer home with me to modify. The drawer was one long piece. Instead of cutting a hole in it and leaving it as one drawer we decided to make two smaller drawers. To cut it I used my chop saw on the front & back then connected the two cuts with a jig saw. I added plywood to make the sides. The center is now stationary.
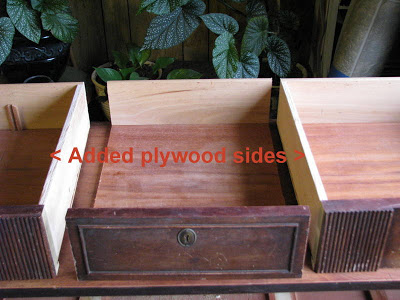
Then I popped off the drawer glides and moved them over to the center of each drawer.
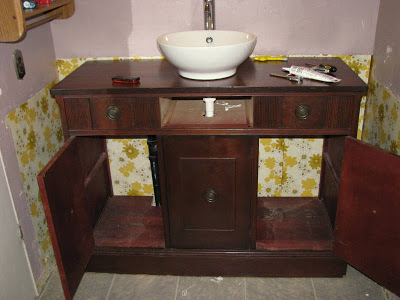
All three doors open so she has plenty of storage. Check out that 70's wall paper that was behind her previous cabinet ;) To cover it up we used drywall joint compound and spread it around to make texture to match the rest of the walls.
For the plumbing we lucked out with the pipes since they are adjustable. Like I said before each piece of furniture is different so you will have to tweak yours to fit your space.
She is going to paint the entire room a soft gray that coordinates with the new floor we put it. I forgot to mention we did that too. It's sheet vinyl.
I live an hour and a half away from my sister so I told her she had to have the bathroom ready when I got there since we only had one day to get this done. All by herself she tore out the old cabinets, flooring and removed the toilet. You go girl! It has been so much fun watching my sister become more and more comfortable with DIY. When we remodeled her kitchen I did most of it because I am a bit of a control freak about this sort of thing and she was comfortable letting me. Halfway through the kitchen project I realized that I needed to delegate. So I did. She finished up a lot of the little things herself. She is more comfortable with power tools now and I am pretty sure she will tackle her next bathroom project by herself which makes me proud.
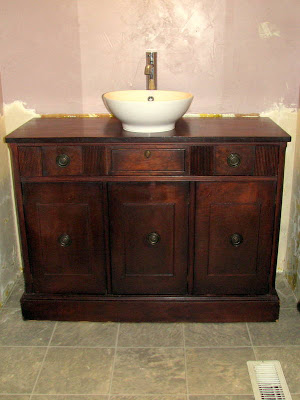
I'm jealous. The vanity turned out beautiful. I wish I had better photos. The choice of not painting it was the right one. I can't wait to see the room painted and with the mirror installed. I love how there is room on each side of the cabinet to really make it look like a piece of furniture.
I think Iwant need one.

To see my sisters kitchen remodel go here.
She is going to paint the entire room a soft gray that coordinates with the new floor we put it. I forgot to mention we did that too. It's sheet vinyl.
I live an hour and a half away from my sister so I told her she had to have the bathroom ready when I got there since we only had one day to get this done. All by herself she tore out the old cabinets, flooring and removed the toilet. You go girl! It has been so much fun watching my sister become more and more comfortable with DIY. When we remodeled her kitchen I did most of it because I am a bit of a control freak about this sort of thing and she was comfortable letting me. Halfway through the kitchen project I realized that I needed to delegate. So I did. She finished up a lot of the little things herself. She is more comfortable with power tools now and I am pretty sure she will tackle her next bathroom project by herself which makes me proud.
I'm jealous. The vanity turned out beautiful. I wish I had better photos. The choice of not painting it was the right one. I can't wait to see the room painted and with the mirror installed. I love how there is room on each side of the cabinet to really make it look like a piece of furniture.
I think I
To see my sisters kitchen remodel go here.
Playing at the following parties: